Upgrading your traditional bicycle to an electric bike can be a rewarding project that combines the joy of cycling with the convenience of electric assistance. This transformation not only enhances your riding experience but also extends the range and versatility of your bike. In this article, we will guide you through the process of converting your traditional bicycle into an electric bike, covering essential components, tools, and steps required for a successful upgrade.
Understanding the Basics of Electric Bike Conversion
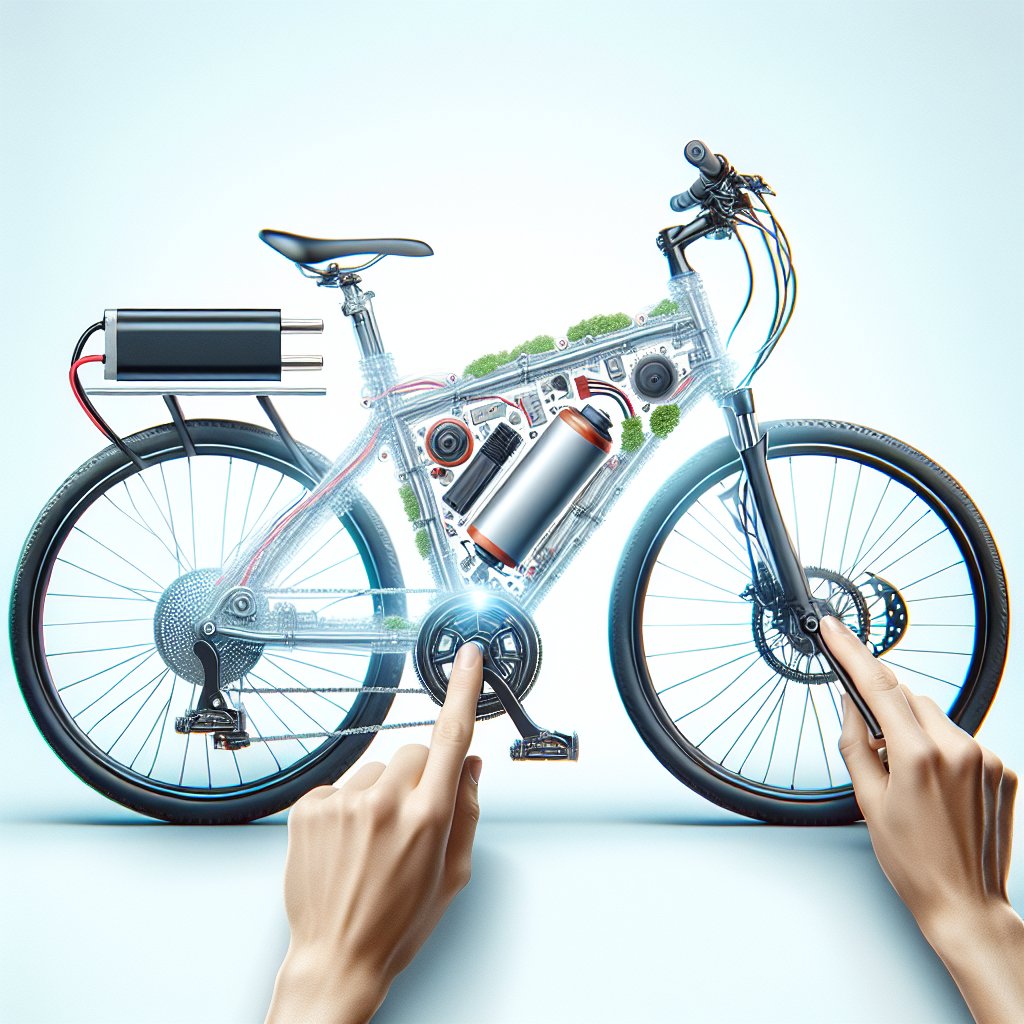
Before diving into the conversion process, it is crucial to understand the basic components and principles of an electric bike. An electric bike, or e-bike, typically consists of a motor, a battery, a controller, and various sensors and displays. These components work together to provide pedal assistance or full electric propulsion, making cycling easier and more efficient.
Key Components of an Electric Bike
- Motor: The motor is the heart of the e-bike, providing the necessary power to assist or propel the bike. Motors can be hub-mounted (in the wheel) or mid-drive (near the crankset).
- Battery: The battery stores the electrical energy required to power the motor. Battery capacity is measured in watt-hours (Wh) and determines the range of the e-bike.
- Controller: The controller manages the flow of electricity from the battery to the motor, ensuring smooth and efficient operation.
- Sensors: Sensors, such as pedal-assist sensors (PAS) and throttle sensors, detect rider input and adjust the motor’s power output accordingly.
- Display: The display provides information such as speed, battery level, and assistance mode, allowing the rider to monitor and control the e-bike’s performance.
Choosing the Right Conversion Kit
One of the most critical steps in upgrading your traditional bicycle to an electric bike is selecting the appropriate conversion kit. Conversion kits come in various configurations, each with its own advantages and disadvantages. Here are some factors to consider when choosing a conversion kit:
Motor Type
- Hub Motor: Hub motors are integrated into the wheel hub and can be installed in either the front or rear wheel. They are relatively easy to install and provide a smooth and quiet ride. However, they may not offer the same level of torque and efficiency as mid-drive motors.
- Mid-Drive Motor: Mid-drive motors are located near the bike’s crankset and drive the bike’s chain. They offer better weight distribution, higher torque, and improved efficiency, making them ideal for hilly terrain and off-road riding. However, they are more complex to install and may require additional modifications to the bike’s frame.
Battery Capacity
The battery is a crucial component of the e-bike, as it determines the range and performance of the bike. When selecting a battery, consider the following factors:
- Capacity: Battery capacity is measured in watt-hours (Wh) and determines how far you can ride on a single charge. Higher capacity batteries provide longer range but are also heavier and more expensive.
- Voltage: The voltage of the battery should match the voltage requirements of the motor and controller. Common voltages for e-bike batteries are 36V, 48V, and 52V.
- Mounting Options: Batteries can be mounted on the bike’s frame, rear rack, or inside a custom enclosure. Choose a mounting option that suits your bike’s design and your personal preferences.
Additional Components
In addition to the motor and battery, a conversion kit may include other components such as a controller, sensors, display, and wiring. Ensure that the kit you choose includes all the necessary components and is compatible with your bike’s specifications.
Preparing Your Bicycle for Conversion
Before installing the conversion kit, it is essential to prepare your bicycle to ensure a smooth and successful upgrade. Follow these steps to get your bike ready for conversion:
Inspect and Clean Your Bike
Start by thoroughly inspecting your bike for any signs of wear or damage. Check the frame, wheels, brakes, and drivetrain to ensure they are in good condition. Clean your bike to remove any dirt, grease, or debris that may interfere with the installation process.
Gather Tools and Supplies
Having the right tools and supplies on hand will make the conversion process more efficient and enjoyable. Here is a list of common tools and supplies you may need:
- Allen wrenches
- Screwdrivers
- Wrenches
- Torque wrench
- Wire cutters and strippers
- Electrical tape and zip ties
- Grease and lubricants
Remove Unnecessary Components
Depending on the type of conversion kit you are using, you may need to remove certain components from your bike, such as the front or rear wheel, crankset, or bottom bracket. Follow the instructions provided with your conversion kit to determine which components need to be removed.
Installing the Conversion Kit
With your bike prepared and the necessary tools and supplies on hand, you are ready to begin the installation process. Follow these general steps to install the conversion kit:
Install the Motor
- Hub Motor: If you are using a hub motor, start by removing the existing wheel from your bike. Install the hub motor wheel in its place, ensuring that it is properly aligned and secured. Connect the motor’s wiring to the controller and battery according to the instructions provided with your kit.
- Mid-Drive Motor: For a mid-drive motor, you will need to remove the bike’s crankset and bottom bracket. Install the mid-drive motor in the bottom bracket shell, ensuring that it is properly aligned and secured. Reinstall the crankset and connect the motor’s wiring to the controller and battery.
Mount the Battery
Next, mount the battery on your bike’s frame, rear rack, or custom enclosure. Ensure that the battery is securely fastened and that the wiring is properly connected to the motor and controller. Follow the instructions provided with your conversion kit to ensure proper installation.
Install the Controller and Display
The controller and display are essential components that manage the flow of electricity and provide information to the rider. Mount the controller in a location that is protected from the elements and easily accessible. Install the display on the handlebars, ensuring that it is securely fastened and easily visible. Connect the wiring from the motor, battery, sensors, and display to the controller according to the instructions provided with your kit.
Install Sensors and Throttle
If your conversion kit includes pedal-assist sensors (PAS) or a throttle, install these components according to the instructions provided. The PAS is typically installed near the crankset, while the throttle is mounted on the handlebars. Ensure that the wiring is properly connected to the controller and that the sensors and throttle are securely fastened.
Testing and Fine-Tuning Your Electric Bike
With the conversion kit installed, it is time to test and fine-tune your electric bike to ensure optimal performance and safety. Follow these steps to complete the process:
Perform a Safety Check
Before taking your electric bike for a test ride, perform a thorough safety check. Ensure that all components are securely fastened, and that the wiring is properly connected and protected. Check the brakes, tires, and drivetrain to ensure they are in good working condition.
Test the Motor and Battery
Turn on the battery and test the motor to ensure it is functioning correctly. Start with a low assistance level or throttle setting and gradually increase the power to test the motor’s performance. Monitor the display for any error messages or issues that may need to be addressed.
Adjust Settings and Fine-Tune
Depending on your conversion kit, you may have the option to adjust various settings such as assistance levels, throttle response, and sensor sensitivity. Fine-tune these settings to match your riding preferences and ensure a smooth and enjoyable riding experience.
Maintaining Your Electric Bike
Regular maintenance is essential to keep your electric bike in optimal condition and ensure its longevity. Follow these maintenance tips to keep your e-bike running smoothly:
Battery Care
- Charge the battery regularly and avoid letting it fully discharge.
- Store the battery in a cool, dry place when not in use.
- Inspect the battery and wiring for any signs of damage or wear.
Motor and Controller Maintenance
- Keep the motor and controller clean and free of debris.
- Inspect the wiring and connectors for any signs of damage or corrosion.
- Follow the manufacturer’s recommendations for maintenance and servicing.
General Bike Maintenance
- Regularly inspect and maintain the bike’s brakes, tires, and drivetrain.
- Keep the bike clean and lubricate moving parts as needed.
- Check for any loose or worn components and address them promptly.
By following these steps and guidelines, you can successfully upgrade your traditional bicycle to an electric bike and enjoy the benefits of electric-assisted cycling. Whether you are commuting, exploring new trails, or simply enjoying a leisurely ride, your new e-bike will provide a versatile and enjoyable riding experience.
