Creating a backyard shed tailored specifically for cyclists transforms an ordinary space into a hub of convenience and creativity. A well-designed shed not only protects your bicycles from the elements but also offers dedicated zones for maintenance, storage, and relaxation. By focusing on key factors like durability, ventilation, and effective organization, you can build a structure that meets every rider’s needs while elevating the overall backyard experience.
Site selection and planning
Choosing the right location for your shed lays the groundwork for a successful project. Begin by mapping out available areas of your yard, paying close attention to terrain, sunlight exposure, and proximity to your home. Ideal sites are relatively level, free of obstructions, and close enough for easy access but distant enough to avoid clashing with other outdoor activities.
- Ensure good drainage to prevent water pooling around the foundation.
- Avoid low-lying spots that accumulate runoff after heavy rain.
- Position near a power source for convenient tool operation and lighting.
Early planning also involves determining the shed’s footprint and layout. Sketch a floor plan with designated zones for storage racks, workbench areas, and a small lounge corner if space permits. Incorporating a few windows or a clear polycarbonate roof panel ensures natural light, reducing the need for constant artificial lighting.
Design elements for bike accommodation
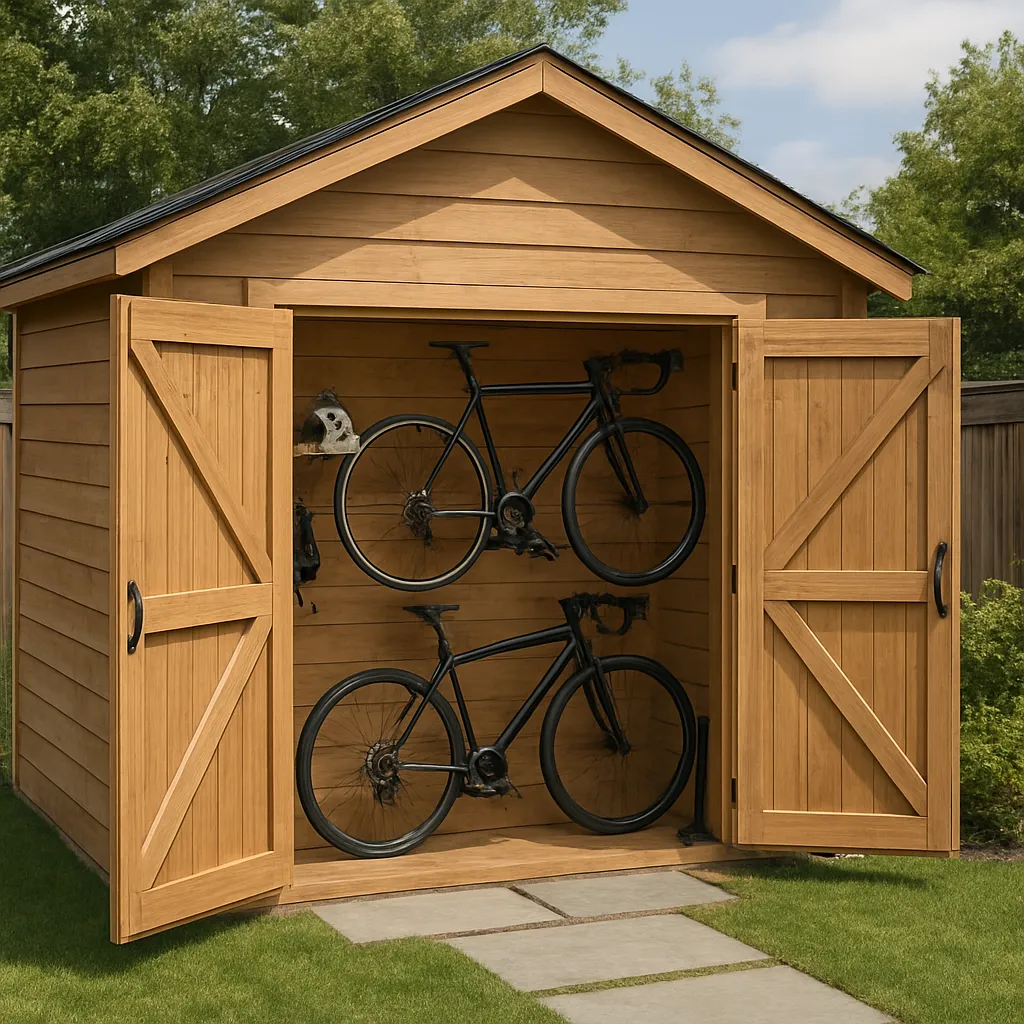
Cyclists require specific features to keep their two-wheelers secure and easily accessible. By integrating vertical and horizontal hanging systems, you can store multiple bicycles without wasting floor space. Sturdy wall-mounted hooks or track rails should be installed at a height that allows wheels to clear each other effortlessly.
Vertical storage
Vertical racks offer a space-saving solution, especially when dealing with full-suspension or heavy e-bikes. Choose metal hooks with protective rubber sleeves to prevent paint scratches. Secure these hooks into solid studs or reinforced plywood panels to handle the bike’s weight over time.
Horizontal storage
Horizontal wall rails are ideal for quick-access bikes that see daily use. Position rails at varying heights to accommodate frames of different sizes and styles. Leave a minimum of 12 inches between each bike to prevent handlebars and pedals from tangling.
Additional design considerations include a raised platform or concrete pad at the entrance to keep tires clean before entering the shed. A covered overhang protects against rain and creates a transition zone where you can adjust saddle height or inflate tires without tracking dirt indoors.
Storage solutions and accessories
Effective organization is crucial for a functional bike-friendly shed. Allocate zones for tools, spare parts, and cleaning supplies to streamline maintenance tasks. Pegboards, drawer cabinets, and modular shelving units work together to keep essentials visible and within arm’s reach.
- Workbench: A sturdy bench with built-in vices and clamps makes repair work comfortable. Opt for a bench top resistant to chemical spills and easy to clean.
- Tool storage: Magnetic strips and labeled tool racks on the wall minimize clutter and speed up retrieval.
- Parts bins: Transparent plastic bins with drawers allow you to see small items like nuts, bolts, and brake pads at a glance.
- Cleaning station: Install a hose bib or a small utility sink for quick rinses of muddy components. A fold-down table reduces wet floors by providing a drip zone outside the main shed.
- Lighting: LED strip lights under shelves and task lamps over the workbench ensure you never miss a detail during delicate adjustments.
For those who love customizing their ride, dedicate a corner to painting and finishing. A small spray booth with an exhaust fan improves ventilation and reduces overspray. Include a filtering curtain to keep dust at bay and maintain a clean finish on frames and parts.
Construction and finishing touches
When breaking ground, choose materials that enhance weatherproofing and security. Pressure-treated lumber for the framing resists rot and insect damage, while exterior-grade plywood or composite panels form a tough shell. For roofing, metal sheets or asphalt shingles with proper underlayment safeguard against leaks and ensure long-term performance.
- Sustainability: Consider reclaimed wood or eco-friendly insulation panels made from recycled fibers. These options reduce environmental impact and provide superior thermal properties.
- Security: High-quality locks and welded steel hasps keep bicycles safe from theft. Motion-activated lights and a reinforced door frame further deter intruders.
- Aesthetics: Match your shed’s exterior finish to your home or garden style. Paint colors should blend with existing structures, while decorative trim adds visual appeal.
- Accessibility: Wide double doors make moving bikes and bulky equipment easy. Install a low-threshold ramp if you plan to bring in heavy e-bikes or cargo bikes on a regular basis.
Finally, add personal touches to make your shed a destination, not just a storage space. Hang cycling posters, display vintage jerseys under UV-protected frames, and include a small seating area with comfortable stools or a bench. Incorporate hooks for helmets, gloves, and high-visibility vests near the exit so you’re always ready for a ride.
By carefully planning each aspect—from site selection and structural design to storage optimization and finishing touches—you’ll end up with a truly DIY-friendly and multi-functional bike shed. This dedicated sanctuary will protect your gear, foster hassle-free maintenance, and inspire many memorable rides for years to come.